


How to build a mortgage fintech: start dumb and automate over time
Lessons learned building the tech for a venture-backed mortgage fintech from the ground up


Prior to building our mortgage fintech Fraction, one of my co-founders and I had built another startup: an automated social media marketing app.
We had identified a problem (real estate agents wanting to find buyers and sellers) and came up with a solution (a fully automated Facebook advertising engine built for realtors, controlled by a mobile app). We pitched it as “an entire advertising agency in your pocket”.
We spent over a year on nights and weekends building out our vision for the platform. We built a beautiful app experience with a great UX and ridiculously smooth onboarding. We created customizable (but templated) ad creative, a content posting system with built-in lead capture, and even an entire CRM! We automated so many different parts of the Facebook ad stack that I knew their API inside and out and even built scraper bots to automate the features that weren’t accessible via API.
The response? We fell flat on our faces. Nobody really wanted to use the product. We quit our jobs to give it our full attention and tried cold calling for sales. We played around with various pricing models. We even tried giving it a way for free. But it was a slog to get anyone to sign up—we probably made a grand total of around $1000 from the app.
We should have been dumber about it
The biggest problem was that we were building this for a problem we didn’t fully understand. We built an automation system first and a solution to a problem second. We were too busy thinking “how can we scale this to millions of users?” that we didn’t focus enough on solving a problem for the first 100 customers. We kneecapped ourselves by making iteration in the early days challenging.
At the same time as we were trying to pitch agents on this tool, there was a guy who was running a course via a Facebook group to teach real estate agents how to run ads on Facebook: essentially doing the exact same thing we had automated. He was charging thousands of dollars per seat and he had thousands of agents go through his course: he was making millions!
Because he was teaching people how to do the process manually, the real estate agents were able to customize their ads to exactly what they wanted. Conversely, because we had automated everything, our system was less flexible. Users didn’t feel they could differentiate themselves when using our templated ads.
The insight we had missed was that even if people were using templates from the course, they felt a sense of agency from the course that they didn’t get with our app.
Solve the problem manually, then build automation around it
We were building an entirely automated advertising agency, but we were doing it backwards. We should have started by building an actual advertising agency and figuring out what our customers actually wanted and how to solve those problems. If it had all been a manual process at the beginning, we could have iterated much more quickly.
By building an app and all the backend automation first, we had spent around a year building before we ever got real feedback on what we were offering. We of course talked to potential customers while we were building (people said they loved the idea), but the real feedback came from signups and usage patterns (people didn’t actually use the app).
Once we landed on a winning formula, then we should have started building automation to let us scale. We could have even used the revenue from the agency to help fund development costs rather than doing it all out of pocket.
Coming back to mortgage fintech
When we decided to drop that marketing app idea and we were thinking about building Fraction, we made a simple rule: we would do everything manually and build out automation over time.
This gave us a few advantages, but the most significant: we were able to launch pretty much immediately. After we’d received our debt financing (we raised $200 million dollars, the how-to for that I covered more in this post) we set up some very simple systems using spreadsheets and a CRM (Hubspot) and launched about a month later.
By launching right away with manual processes, we realized how much more complex mortgage origination was than we originally envisioned. If we’d waited to build an automated system before launching, it would have taken us the better part of a year and we would have built the wrong thing.
We know this because we iterated on our origination process continuously over the next year. We added steps, we removed steps, we changed documents, we changed the order in which we asked for things, we parallelized some things and we made other things sequential. If we had to make code changes for all of those changes, it would have significantly slowed down our iteration cycles and hurt our growth.
What we actually needed to build and how we progressed from manual to automated
This is a non-comprehensive list of everything that we ended up building. Most of these systems interacted with each other in some capacity and so the order in which they are built is important, but here are the broad strokes.
Application submission
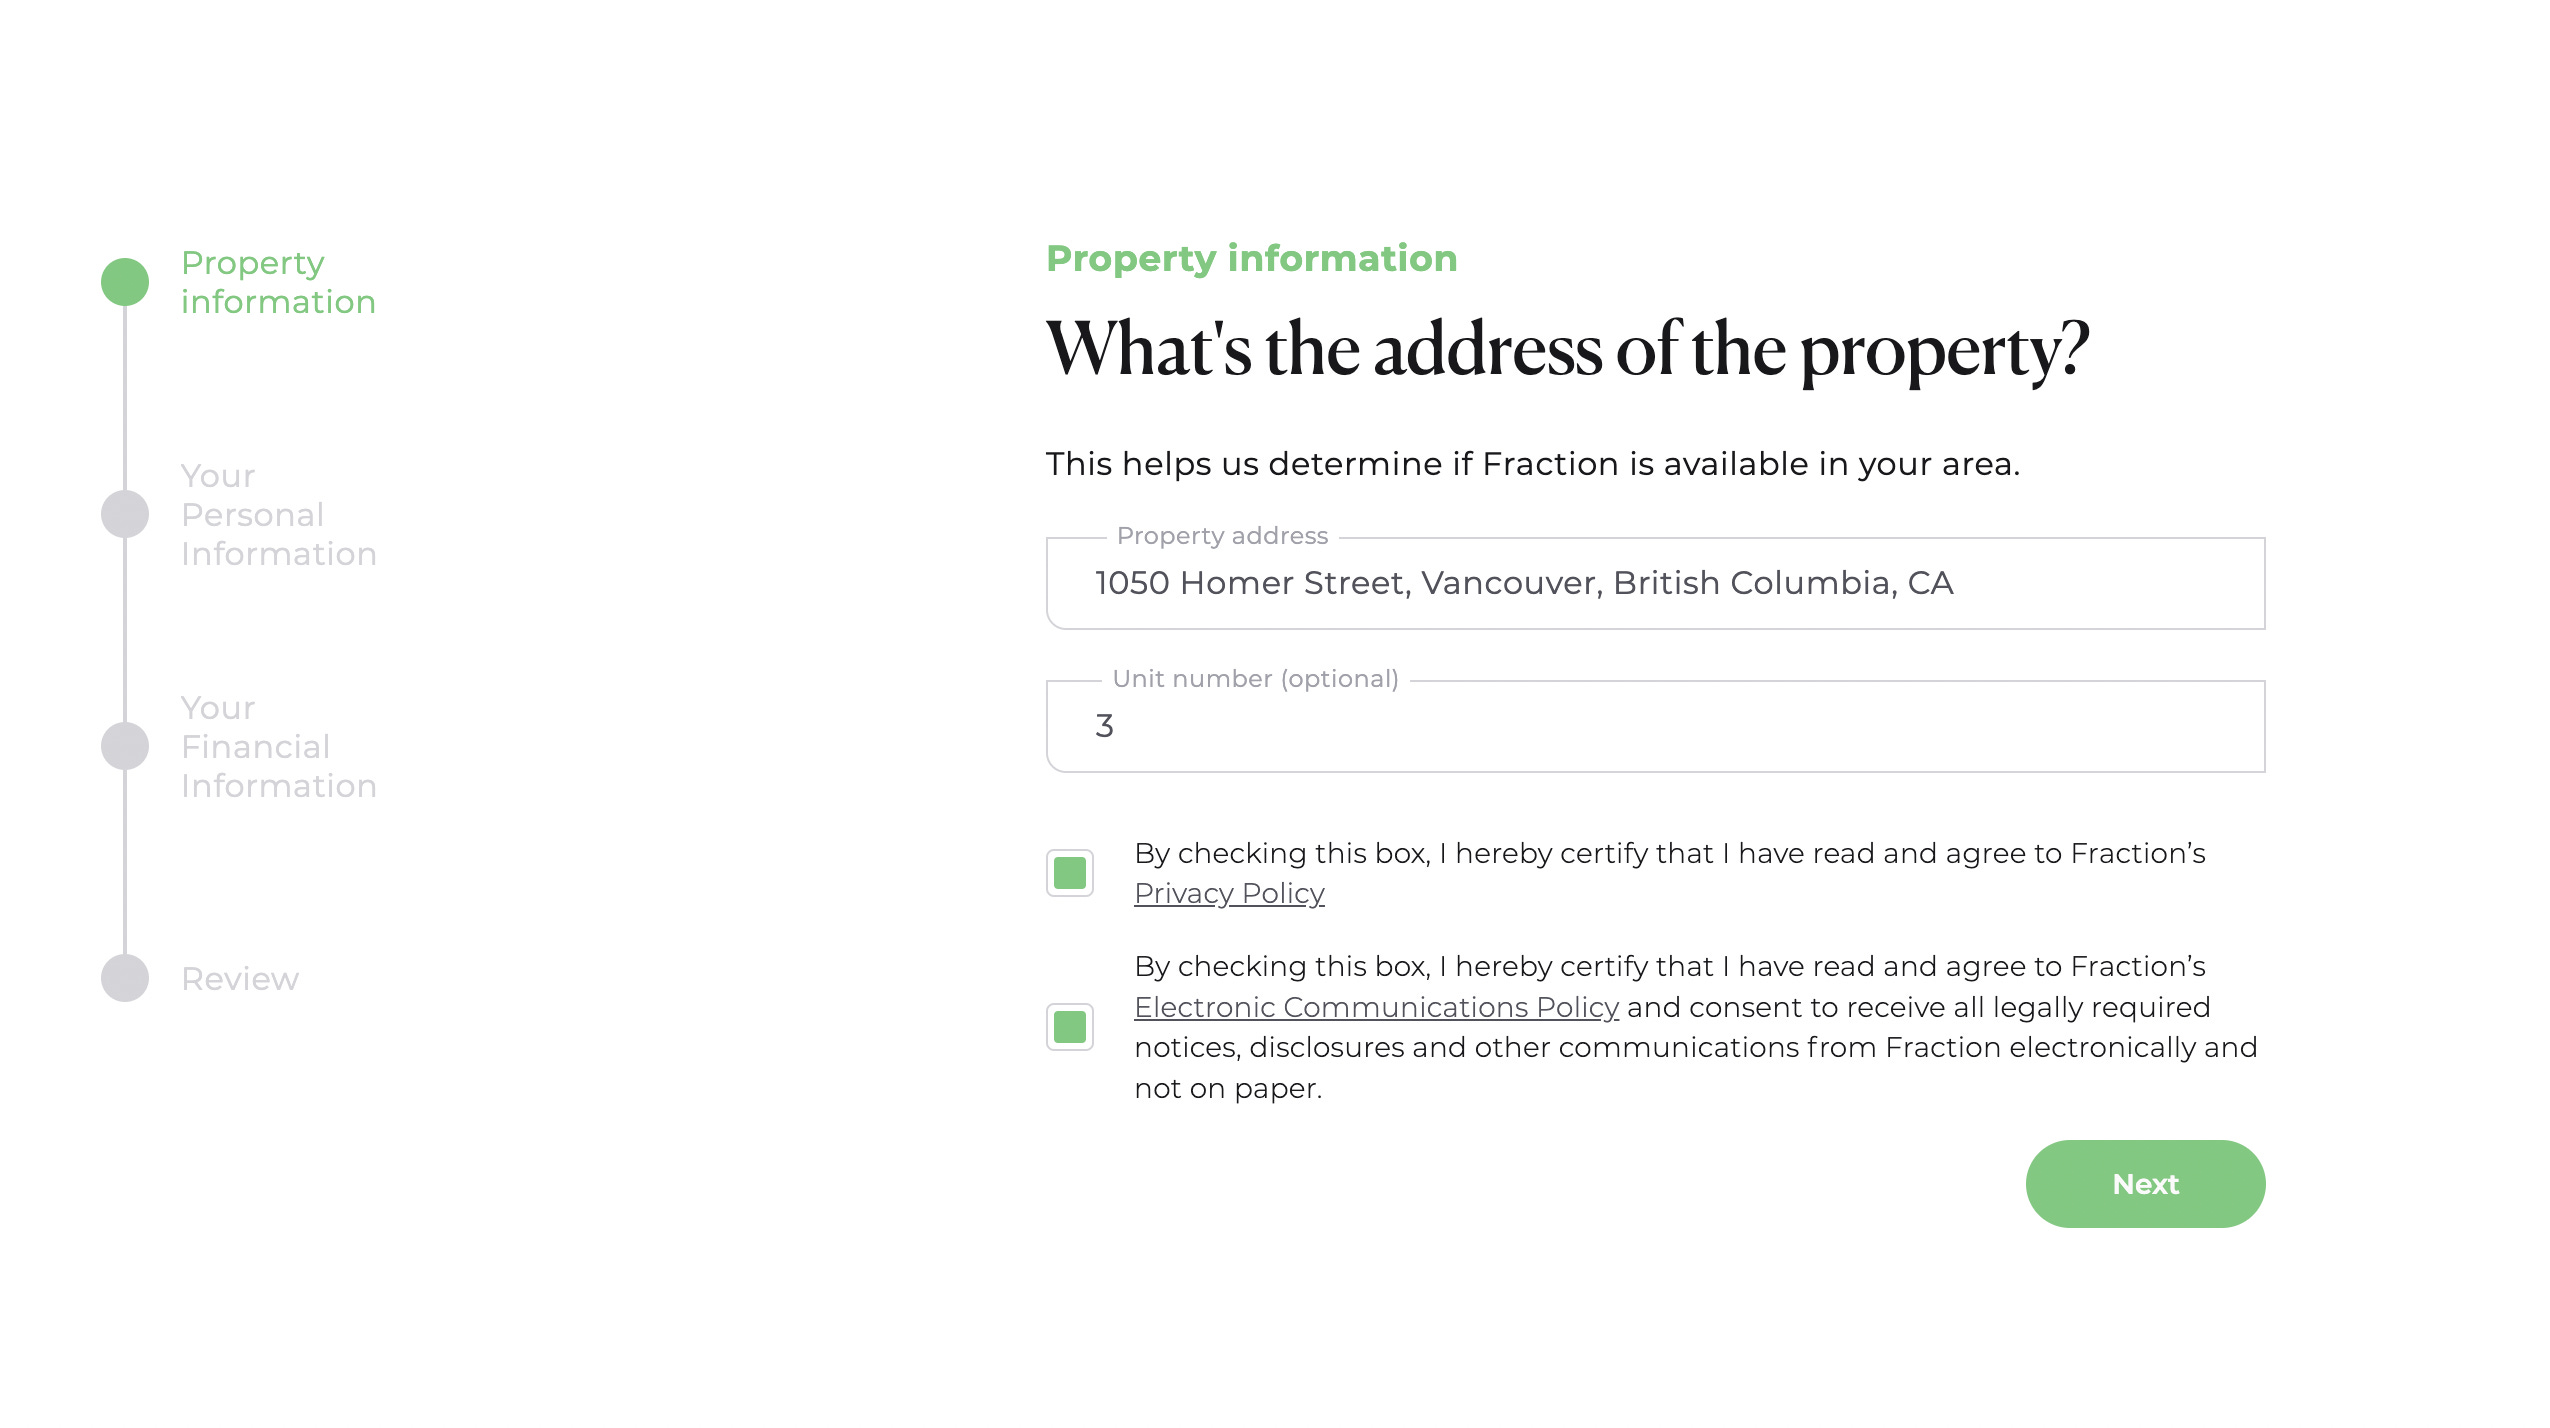
First and foremost, potential customers need to be able to apply for your mortgage. This is probably the first thing you should build as it’s what is stopping you from launching.
You need to decide whether you want to accept applications directly from homeowners (or prospective homeowners) or from brokers. Each has it’s own go-to-market strategy, so I’d suggest starting with one channel and building your submission system around that to begin with rather than tackling both at once.
Application submission: the manual version
We started with a PDF people would fill out and quickly graduated to a Hubspot form. This worked for both direct to consumer and brokers submitting applications.
When people submitted the form, someone from the Fraction team would manually send an email to confirm receipt and manually enter the data into our system.
Application submission: the automated version
Direct from homeowner: We built a React-based web form in Typescript with an AWS backend where users would fill out their information and the form would dynamically change which subsequent questions were asked based on what information the user provided (such as region, the amount on their existing mortgages, etc).
Data would be sent to our server as the applicant was filling out the form so that we could track drop-off rates and so that we could follow up with links to allow people to resume their application if they bounced before completion.
Via mortgage broker: For Canadian applications, we built integrations with the three major mortgage broker submission tools: Filogix, Newton Velocity, and Finmo.
We would ingest applications from those sources and then transform the data by pulling from a variety of third-party sources to make the data match the same format that we'd receive from the direct-from-consumer applications. Fuzzy-matching property addresses to Google Maps was actually a pretty challenging part of building this out, as was matching names (people often use nicknames or they have English names that don’t match their legal names, for example) so there was sometimes manual reconciliation there.
For American applications, we provided affiliate links to our direct-to-consumer application portal that we then can attribute anything submitted via that link for that broker. We did this because there aren’t these massive submission portals that own the market for brokers in the United States like there are in Canada.
Underwriting
The process of underwriting, is, simply, looking over the submission, verifying that the information is true, making sure that the application matches your lending criteria and deciding whether to proceed or not with the file. It’s a very important step that you need to have nailed down with a consistent process.
Underwriting: the manual version
Someone from the Fraction team would manually review every file. They'd pull credit reports manually, they'd pull the title report manually. They’d review income documents manually. They'd cross-reference the data from those and the user-provided information to determine whether the applicant fit our lending criteria and wasn’t falsifying information.
Underwriting: the automated version
As an applicant was filling our their application, we would dynamically underwrite them based on the information they provided. We’d also pull additional information on that person from third-party sources. Some of the third-party data costed us money to request (such as title reports and credit reports) so we built an engine to do as many of the free checks based on user inputs first, and then cascade through to the paid checks if the application passed those initial steps. We’d do those paid checks one at a time, ordering by cost.
Note that it took us multiple months (in some cases, the better part of a year) to even get access to the credit bureaus and title pull companies' APIs. Also note that they generally all will have a monthly setup fee that will be in the low tens of thousands of dollars and then usage-based fees, oftentimes with monthly minimums.
It can be challenging to get connected to the right sales people inside the credit bureau organizations that will actually push for you internally in those organizations, so make sure to try to find a champion for your organization inside theirs. If you are venture-backed, your investors might have connections you could leverage.
Also note that there oftentimes are special edge cases in files that would be challenging to cover with automation, so it's important to have the ability for manual overrides for your underwriting team to be able to use. An example of this are people submitting applications on behalf of family members for whom they have power of attorney.
Task and status tracking
As the application went through our pipeline of submission, underwriting, appraisals, inspections, as various documents got signed, as we educated the customer on our unique product, and as they would work with lawyers to finalize documentation, we would need to keep track of all those events to keep the customer, the broker, and our internal teams abreast on the status of a given file.
Task and status tracking: the manual version
Our operations team would manually move an applicant's file through various stages in our pipeline. We used Hubspot for this.
One of the challenges with having a pipeline model for this is that not every task needed to be done in sequence. We could have the applicant do an inspection at the same time as an appraisal at the same time as we gave them a quiz to ensure that they understood our product.
Hubspot didn’t really work for those parallel tasks, so the operations team would also keep a spreadsheet checklist of tasks for a given application that they would attach to the file.
Task and status tracking: the automated version
We built a task management system that would allow for parallel tasks with dependency-tracking so that applications could move to the next stage in the process only once N tasks were completed, but within that stage, the order of those N tasks didn't matter.
When events occurred (such as documents being signed), we would fire events that would update the task status for a given loan. That would then allow us to send out automated notifications to the customer, the broker, and our internal teams.
Appraisals and inspections
Lenders will generally require an appraisal and will also sometimes require an inspection. These are two different things that have different professionals and they produce different outputs.
Appraisers look at the market and the property and give an estimate of the home’s value. Inspectors go and make sure there isn’t anything materially wrong with the actual home that could grow into problems that cost lots of money.
For appraisals, there are automated appraisals called Automated Valuation Models (AVMs) that will take publicly available data to provide an estimate of the home’s value. Generally, these are believed to be less accurate than an in-person appraisal by providers of capital (although this is debated), and they may want you to use an in-person appraisal.
AVMs are obviously much faster (instant!) and cheaper. Whether you use an AVM or an in-person appraiser will generally be decided by what your capital providers require.
At Fraction, we required an in-person appraisal for every mortgage and inspections for particularly large mortgages.
Appraisals and inspections: the manual version
Our operations team would connect the applicant with the appraisers and inspectors.
Sometimes the appraisers would take payment from the applicants directly, although if you used a portal like Solidifi you could also pay on behalf of the client. We ended up using Stripe payment links to collect payment from the applicants and then pay for the appraisal on the Solidifi platform.
Collecting payment for an appraisal (which would generally cost around $400) turned out to be a great way to determine intent to see if the applicant was serious about continuing with the process, so we baked it into our sales process.
Once the appraisal or inspection was complete, the reports would be sent by the appraiser/inspector directly to our team. Our underwriting team would manually review the reports.
Note that although the applicants would bear the cost of the appraisals and inspections, we also would have a relationship with the inspector/appraiser so that we would receive the report directly to ensure that the reports weren’t being doctored by a borrower or their broker.
Appraisals and inspections: the automated version
We never automated this. It is a very manual process to review these reports and to schedule the appraisal between the appraiser and the homeowner (who would need to provide entry into the property to the appraiser).
Theoretically if appraisers all used a specific scheduling software like Google Calendar we could have built a Calendly-like tool to facilitate scheduling between homeowners and appraisers, but that would have been overkill for what was a relatively painless part of the process for homeowners.
Appraisals generally follow a standard format and so interpreting it could probably have been automated to some degree, although our underwriters would look at the methodology that the appraiser used to determine the value and would evaluate whether that was rigorous enough. Inspections have no specific format and include photos to illustrate what the inspector found, so it would have been extremely challenging to automate interpreting these reports.
Document generation
There are a LOT of documents in mortgage-land. There are pre-approval letters, there are rejection notices, there are disclosure documents, the actual full mortgage documents, monthly statements, and more.
Having a good system for generating these documents and managing signed copies is a significant lift; without it, you’ll have people where the majority of their job will just be creating and sending these documents to applicants and brokers.
Some documents were per-application and some were per-applicant (so you would need two copies if there was a couple applying for a mortgage).
Document generation: the manual version
We created the templates in Google docs and would create copies for each loan. We’d manually send pdfs and manually store the resulting copy.
Document generation: the automated version
We had three iterations of our document generation system.
Iteration 1: In the first version, we used the Google Drive API to modify templates we made with Google Docs. This turned out to be a hassle for a few reasons:
The API didn't really seem to be designed for complex document generation. For one thing, all the commands were imperative rather than declarative, so it made it challenging to visualize how the code would translate to a document. Doing anything more advanced that keyword replacement (such as creating and filling out tables) was very manual.
Additionally, the API for actually producing a PDF was very slow—we ended up having to build an asynchronous polling system because our lambdas that triggered the document generation would often time out before the documents were created.
Iteration 2: We used PandaDoc to create templates that would hook up to Hubspot and auto-fill variables based on the data in the Hubspot deal or contact objects. That worked pretty well, although a human would still need to trigger the document generation, but it would only support loan-level information, not applicant-level information. It wouldn't pull in contact data associated to the deal on Hubspot, causing us to need to duplicate a lot of data in our CRM so that our document generation tool could have access.
Iteration 3: The final version used react-pdf to generate documents where we would pull data directly from our database. This provided us with extreme flexibility for what the documents looked like—both in terms of style and structure. We could add N number of applicant signature fields to any given document, or we could easily generate tables of data based on formulas that took application-specific information as input.
We could also now generate documents for the overall application or individual documents for each applicant specifically.
Our interest rates changed all the time, so being able to leverage automation to regenerate our sales brochures with new rates was a huge help to reduce grunt work for our graphic designer.

Additionally, since react-pdf uses React's JSX templating language, it let us easily visualize the structure of the document in code. These pdfs could then be fed into Dropbox Sign to request signatures.
Something to note is that these documents aren't static. States will change their laws around mortgages reasonably frequently (potentially once or twice a year per state), so we were originally told that we would have to integrate with specialized providers that generate mortgage documents for you and have in-house teams of lawyers that watch all the regulatory changes and make sure your documents comply.
However, these systems are very inflexible, extremely painful to integrate with (like it took me multiple days just to grok their API documentation for their data format specification), and you lose control over the look and feel of your documents and how they integrate into your broader platform.
Luckily, we found out that there's a tool called AllRegs where you can subscribe to learn about regulatory changes and be notified of relevant changes for you to update your documents on an as-needed basis. If you pay for a subscription to AllRegs, it lets you keep control over your document generation systems without needing to integrate with those mortgage document generation providers.
Home value tracking
After you’ve given the mortgage, you will want to monitor the home values of your portfolio periodically to make sure it’s still healthy.
Home value tracking: the manual version
In Canada, we would use Teranet's dashboard to get home valuations which we used to track the value of our portfolio of homes over the course of the loan. Those would be manually entered into a spreadsheet.
In the United States, we used HouseCanary for automated home valuations.
Home value tracking: the automated version
For Canada, we integrated with Teranet's API to fetch valuations which we would then store in our database. We built a batch job tool using lambdas triggered by SQS to run those batch jobs.
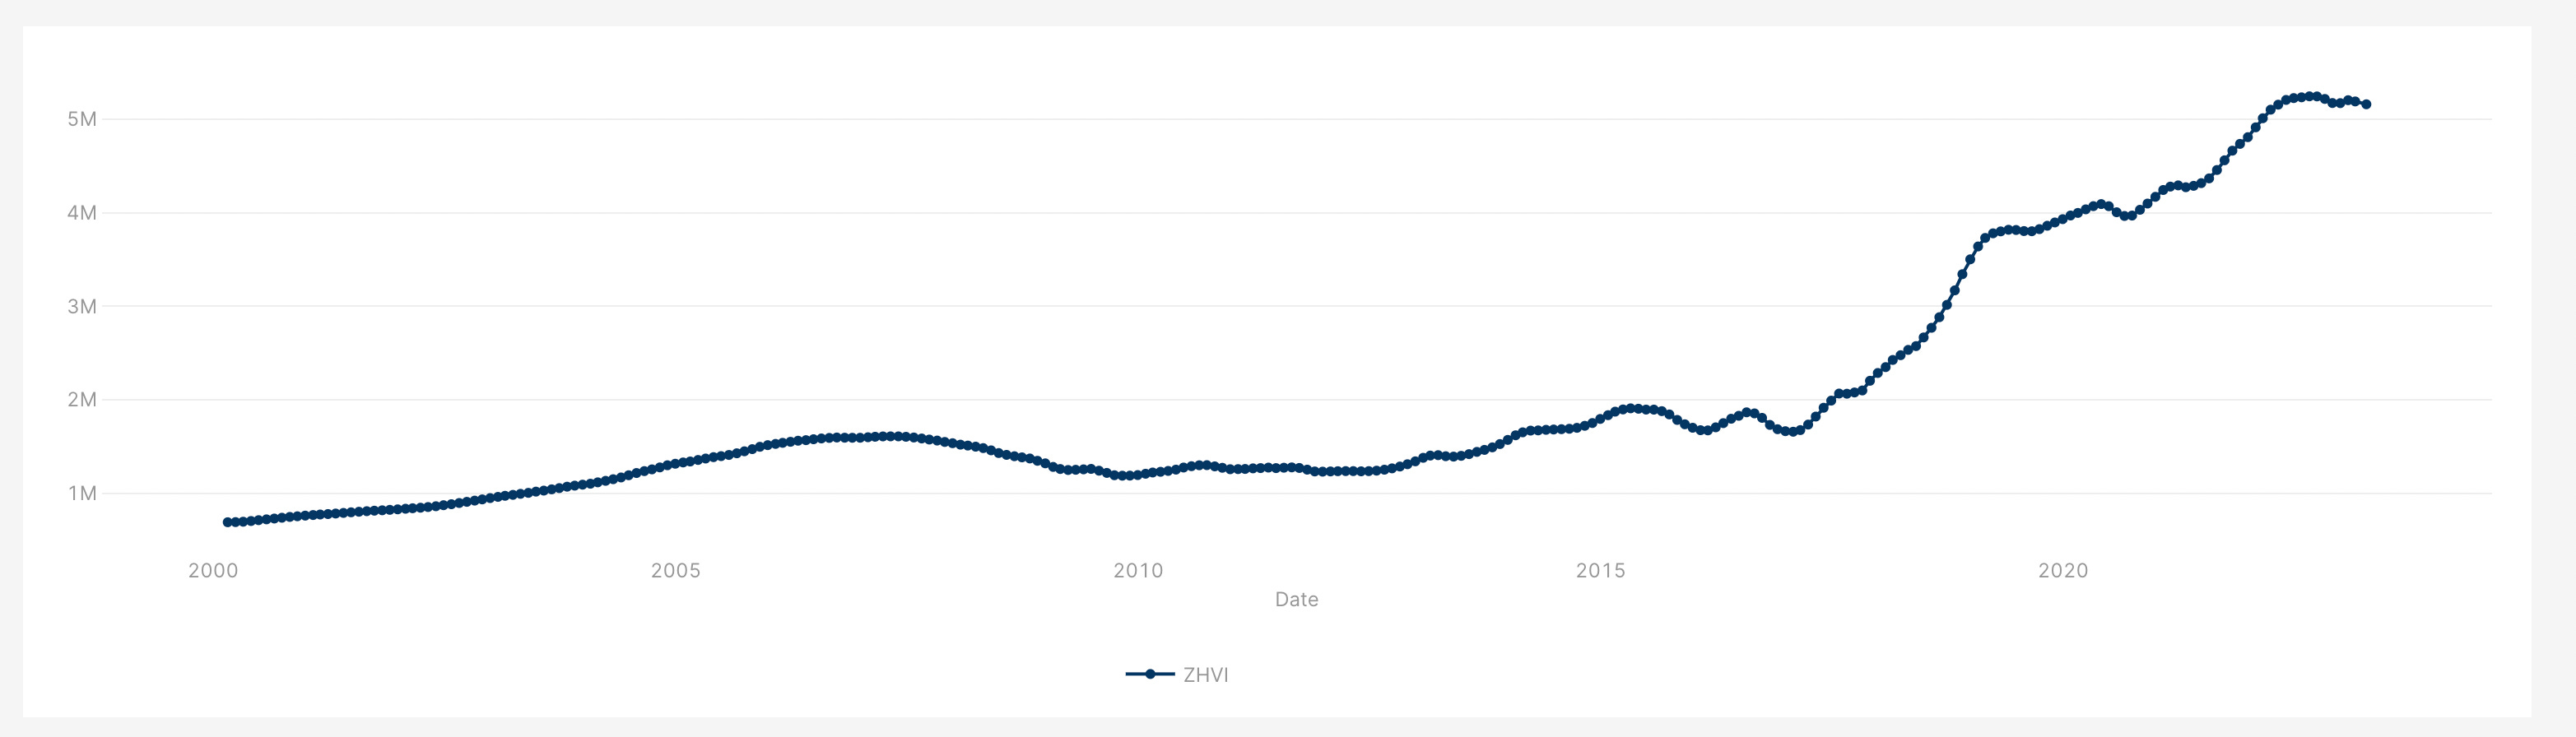
For the United States, we built a tool to download Zillow's Home Value Index spreadsheet that they publish once a month for every postal code. We would then take the delta from one month to the next to determine the change in value of a home within that zip code to get an estimate of property value change.
Note that Zillow sometimes retroactively changes their historical ZHVI data, so you might want to store each month’s data independently depending on your use-case.
HELOC payments and draws
Most mortgage products will require customers to make periodic (typically monthly) payments. Our particular product was a HELOC where the monthly payments were optional, but we still needed a way to facilitate those payments and draws.
HELOC payments and draws: the manual version
We set up virtual bank accounts using ModernTreasury and provided each customer that had our HELOC product with the account number for that virtual account.
If they wanted to make a payment to their loan, they'd send an ACH or wire to that account, which we would then see and manually record as a payment to their loan.
If they wanted to draw on their HELOC, we set up a simple web form where they'd send their request which would generate an email which would get sent to our accounting department for them to manually send the payment and record it in our ledger.
HELOC payments and draws: the automated version
We built a dashboard where customers could log in, see the status of their loan, check out their interest rate, see their monthly statements, etc. They could connect to their bank account with ModernTreasury and verify ownership of their account using micro-deposit verifications.
Once their account was verified, they could use our UI to make one-off payments or draws or set up monthly recurring payments. The monthly recurring payments would be triggered as a batch once a month from a cron job which would push all the loan payment orders to our SQS queue for batch processing.
We also maintained the ability for people to submit funds directly to their virtual account from their own bank account if they didn't want to connect their bank account to us, but we built webhooks to automatically track those submitted payments in order to update our ledger automatically.
Interest calculation
If you have a servicer, they may keep track of payments, draws, and interest accumulation for you. We did it ourselves.
Since this needed to be updated every day for our HELOC product, we built the automation for this before we launched that product—no manual process here.
We had a cron job that would run every day that would push a message to an SQS queue for each loan that would then trigger a lambda to determine the interest rate and interest accrual for that given day.
Internal administrative dashboards
Your operations and sales teams will need to interact with your systems in some ways. We used a combination of Hubspot and Retool to make this happen at the beginning. This wasn’t so much a “manual” vs “automated” but rather a “simple” vs “advanced” version where we went from using mostly off-the shelf tools to integrating our own systems into those tools.
Some companies build their own web app for their teams—that is a good idea when you are at scale but I think a lot of companies prematurely optimize for this. When I was at Brex, for example, they had hundreds of employees and tens of thousands of customers and they still ran their backend systems primarily off of Retool!
Internal administrative dashboards: the simple version
Much of the initial non-sensitive data we stored in Hubspot. Operations and sales teams could enter the data in directly.
The sensitive data we stored in our databases from the get-go and set up Retool dashboards where operations team members could go and access that information. This also allowed us to block access to only be for specific members of the team.
For more complex operations that may needed to have been performed, we created Retool apps to control those operations. For example, we would use Retool for triggering batch jobs across the entire portfolio, such as for gathering home values.
Internal administrative dashboards: the advanced version
The operations and sales teams ended up becoming very comfortable with the Hubspot workflow. Rather than trying to rip them out of their established systems, we decided to integrate our systems deeply into Hubspot.
For example, we use Typescript, so we built a codegen tool that would pull the schema for all the Hubspot properties and generate Typescript types so that we could statically analyze whether our code was talking to Hubspot correctly. It would also serialize and deserialize data into enums, dates, etc. correctly.
Hubspot has a really fantastic event system—every property change can trigger a webhook. So we built a two-way sync where any change to Hubspot would update fields in our database and vice-versa.
We also built a Chrome extension where we could inject code into the Hubspot dashboard where we could then query our API directly to add additional functionality onto Hubspot for given client files. For example, we would structure data in a way that made more sense for different roles in the company rather than it being the flat key-value store that Hubspot surfaces all data as.
This Chrome extension let us add functionality gradually without having to do a complete rebuild of our operation teams' workflows.
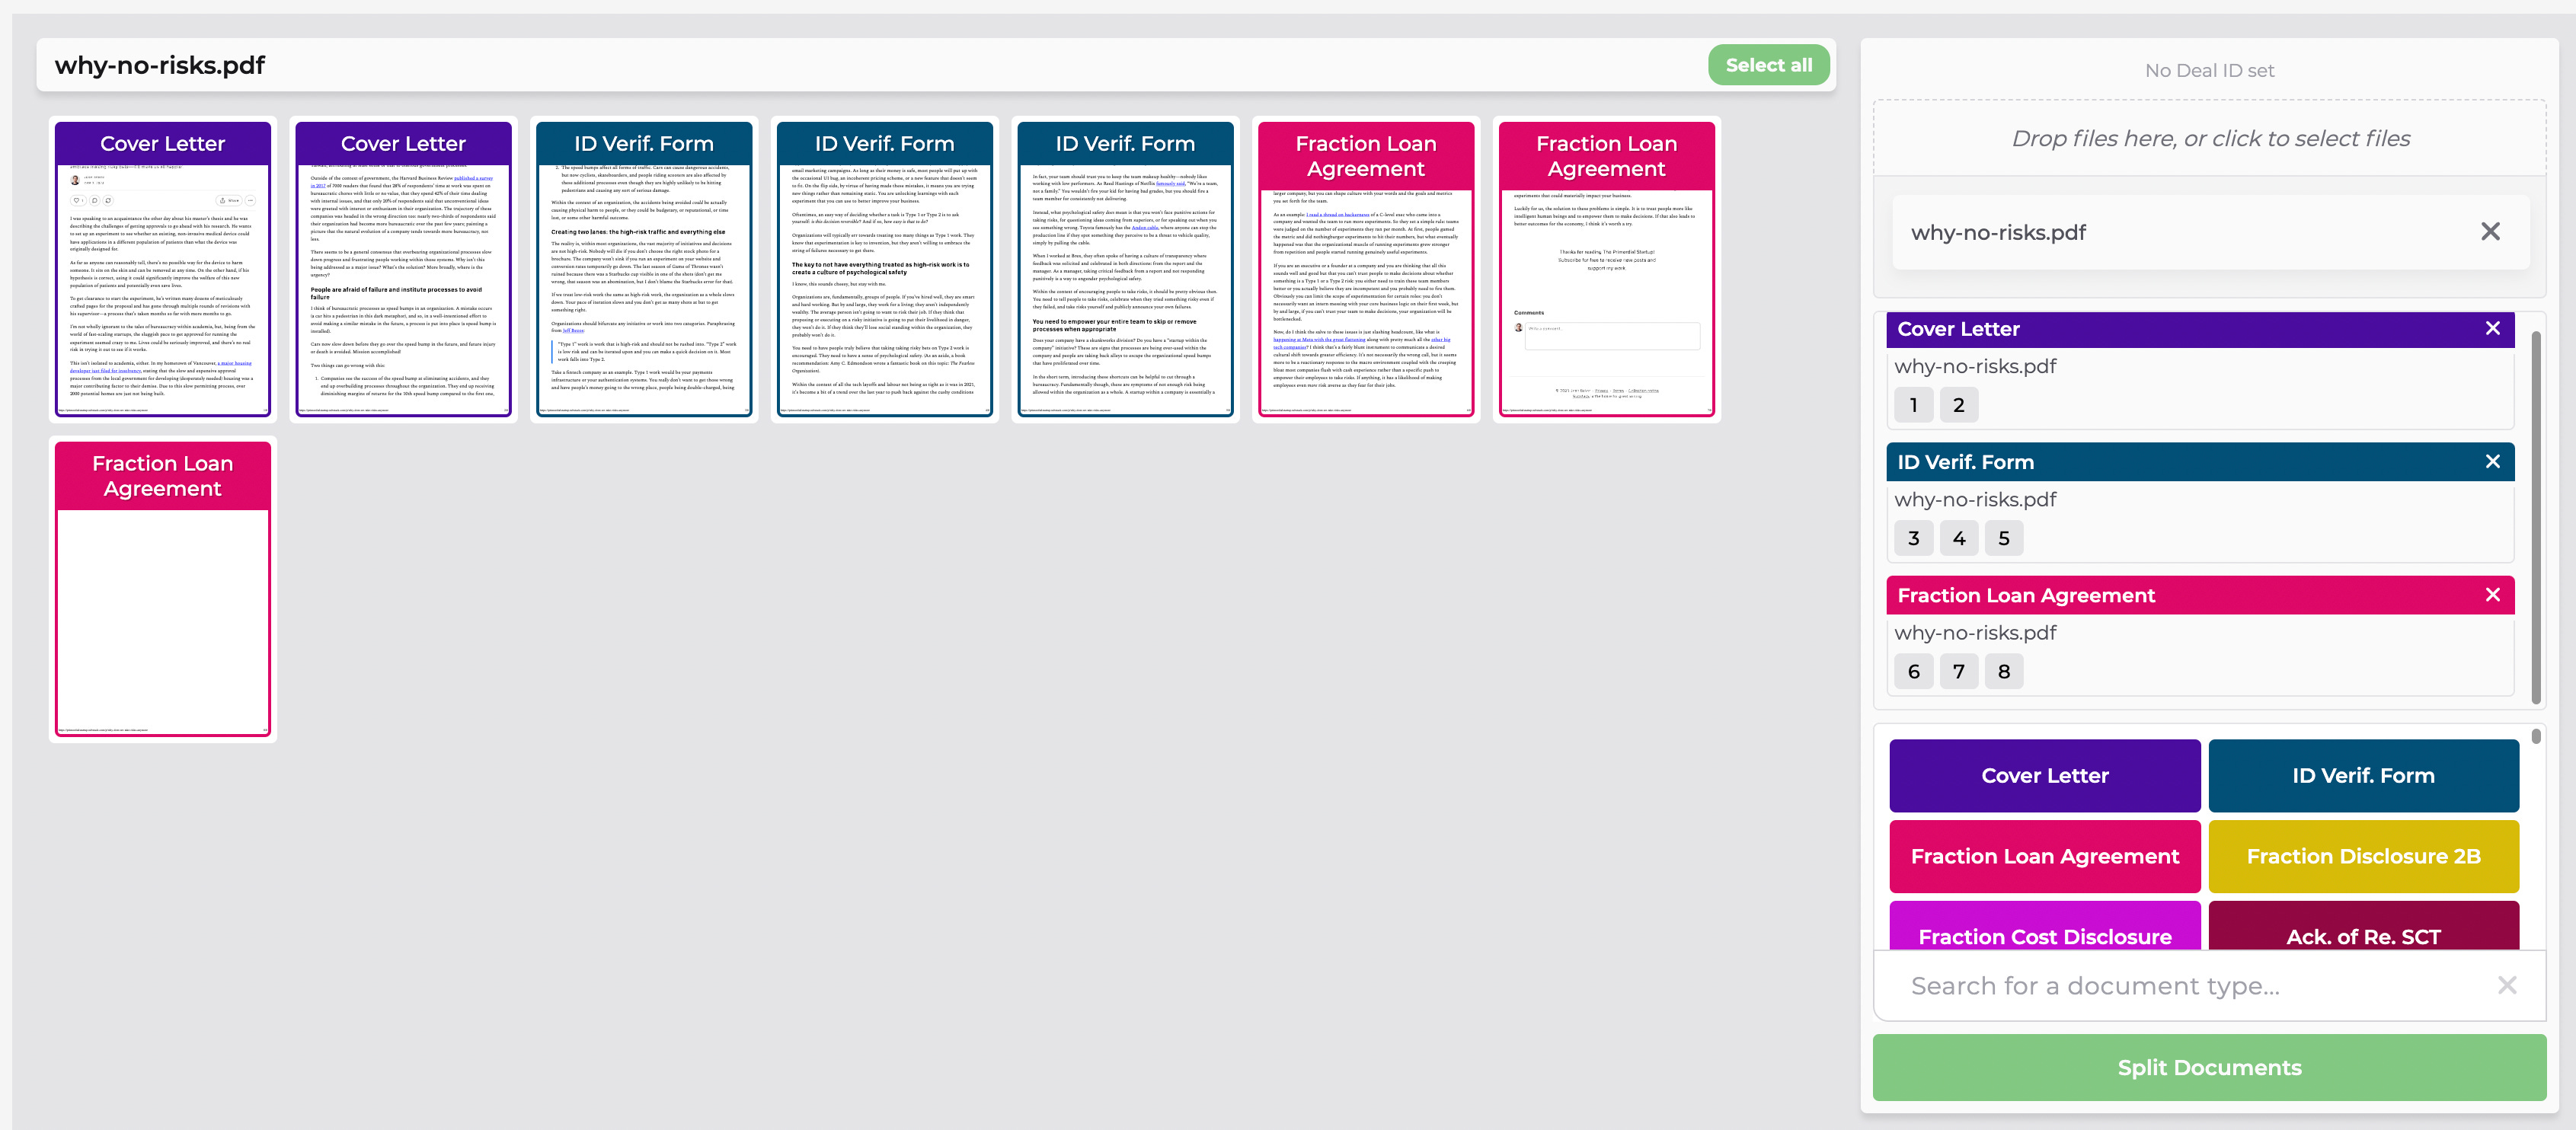
Document ingestion is another big part of the back office operations workflow. This isn’t as simple as just taking documents as they are sent and uploading them. Lawyers, for example, will frequently print off a group of documents at once, get them all signed, then scan them and send them back as a single document. If you want to keep your back office organized, you then need to split and label those documents individually.
We built a document splitting and labeling tool where operations team members could upload documents, specify which part of a document is which type of document, and then upload that to our backend. By labeling them like this, we could incorporate it into our task tracking system to automatically mark certain tasks (that required documents) to be complete.
Data analytics
We started with using Hubspot for reports and keeping track of our other metrics in spreadsheets and Mixpanel for user funnel visualization.
Eventually, we built out a data pipeline with Fivetran and dbt that pulled information from our database, Hubspot, our marketing channels and stored it in Snowflake for visualization in Tableau.
Servicer integrations
Servicers are companies that will manage your loans on your behalf once you’ve funded the applicant. They will collect monthly payments, manage pay-outs, send monthly statements, monitor property tax payments to make sure those don’t go into arrears (property taxes supersede any other lien on title), and monitor home insurance policies. If you don’t work with a servicer, you have to build all that in-house.
Some capital providers will require that you work with a servicer who does that all for you at the beginning, or at least that you have a “backup servicer” who you pay a smaller monthly fee to and if you ever go out of business, they will step in and take over servicing for you.
If you work with a servicer, you have to send loan information to them once you’ve funded your loan. For the servicer that we worked with, they required it to be sent to them in a specific XML file format, so there was no opportunity to do this manually.
Recognize that if you go the servicer route, you'll probably need to build an integration with your servicer and it will take you a couple months—their API documentation could be varying levels of quality and their systems are often quite bespoke so there might be challenges with the integration that doesn't match their documentation that you'll have to work through with them.
Systems we didn’t build
There were some systems that we originally thought would be important but we ended up pushing way back on our roadmap. I’ll speak to those and explain why we made that decision:
Broker dashboards
We thought this would be an important thing to build at the beginning: a dashboard where brokers could submit applications, view the status of these applications, make changes, etc.
The issue, particularly in Canada, is that brokers already have submission tools that they have to use as part of their larger organization. So they won't need your portal and in many cases, won't be allowed to use it.
If you are going to build a broker portal, start by making it primarily about viewing the status of and making edits to an application, including uploading additional supporting documents. Brokers will find that more valuable than being able to submit initial applications.
Also note, however, that brokers don't expect this functionality as many lenders don't provide it, so your time is probably better spent building other parts of your stack first.
Application-management dashboards for homeowners
Your customers will submit their application via whatever method you have set up above. You could then build a dashboard to let applicants see the status of their application, upload additional documents, etc.
Realistically, your operations team can manually keep applicants apprised of the status of their application using email. You could also build in automated notifications based on changes to application statuses using your task tracking system.
These notifications will honestly be most of the value for a customer—being able to interact with you just via email is actually a plus for a lot of people rather than having a whole separate app that they have to use. If you have additional required information, your operations team could just email the borrower requesting that information.
Once you are really wanting to scale and want less manual work for your operations team, a homeowner application dashboard could be useful.
If you end up building one, you'll want to integrate document uploading, be able to surface your task-tracking system to show the status of the application, and have a notification system. Being able to edit information in the application prior to it being submitted for review by the underwriting team can also be useful but you'll want to be careful that they can’t make edits to information after the loan has been approved.
Getting started is more important than getting it perfect
We prioritized which parts we automated first based on which tasks required in aggregate the most time for customers and for our operations and sales teams. Generally, those were tasks that happened earlier in the funnel; this made intuitive sense to us as the further down the sales funnel you got, people would drop out of the funnel and fewer actions would have to be taken for that.
No matter how smart you are or how experienced you are in the space, I guarantee there will be things that you’ve missed and not thought of. You will only be hurting yourself by doing a massive build-out before you start operating, so I encourage you to do as much manually at the beginning and do a gradual migration towards automation as you go. You’ll be surprised what you learn about your business.